Friday, January 24, 2014

Valentine's Day - lots of links!

My little ones are fighting off colds and fevers right now.  On Tuesday, my mother-in-law was here and let me make a quick run to the fabric store.  I got sidetracked by all the fun heart prints right by the door and decided that if my kids are going to be sick, new Valentine's Day pillowcases might cheer them up.  :)  I stayed up late last night finishing these and left them on the girls' beds for them to find in the morning.


Today I managed to finish Isaac's pillowcase too.

The girls and I made a new canvas this week too.  We painted the background pink and while the paint was still wet, we added hearts that we had punched from various papers.  We left one corner blank and after it all dried, I added "love" to it.  It is fun to have this hanging on our wall and know that we all worked together one it!  :)


Other Valentine's Day posts you might like:


Monday, January 20, 2014

Barefoot Books Ambassador Program


I threw out a quick post about Barefoot Books the other day because I wanted to be sure you knew about their big sale.  However, I have lots more to tell you about!  What exactly am I doing?  How does it all work?  Lets do this Q and A style:

How did you hear about Barefoot Books?

Isaac got a Barefoot Book in one of his Citrus Lane boxes.  I gave it to him in September when the girls got their new schoolbooks for the year.  The book, Octopus Opposites, has been his all time favorite ever since!  We have read the book to him numerous times over and love the illustrations. Isaac even started saying many of the words as he began talking.  He asks for his "ah-pus book" often.  The book is a big sturdy size and really stands out as being high quality.  When we got another Barefoot Book in a Citrus Lane box last month I was inspired to look them up online and learn more about them.  After reading about their emphasis on artwork and great stories, and learning more about the company, I was hooked!

You homeschool your kids, run a blog, and now this?  How do you balance it all?

I've said no to quite a few things that I've been interested in.  I could sew things for an Etsy shop, sell products for another company, or even run ads on my blog or market it aggressively.  I could do any of these things successfully, but my main job is to run our home and care for the kids, along with teaching.  I've tried hard to keep my focus and not spread myself too thin.  Many times that means saying no.  However, Barefoot Books just seems to fit really well with my life.  Enjoying great books with my kids and then talking about them to other people doesn't seem like work to me!  This is something we already love doing and now I'll be earning extra income and free books from it.

So, what's in it for you?

For starters, I got a great box of books for $100.  I'm really not out anything there because the books are worth more than that!  Ambassadors get a 30% discount on orders, up to 20% back in free books, and more.  Within the first 60 days there are kickstarter bonuses - two more boxes full of books - that you can earn just by placing orders.

What do you have to do?

Barefoot Books is pretty flexible as far as what I can do with it.   Hosting a party with friends, selling through my customized website, or marketing online are all great ways to make it work.  I am also really excited about the fundraising option.  I can host parties for organizations or schools and give free books or cash proceeds back to them.

Um, can I join?

Yes!  Now is the perfect time to join with the starter kit being on such a great sale.  Its normally $139, but just until the end of the month it is on sale for $99.  I'd be happy to help walk you through the steps that I'm doing right now to get my business started.  Its as easy as planning a launch party at my home with family and friends and collecting a few orders.  Barefoot Books has a really great section of training videos and support for you to access once you are signed up.  Contact me if you are interested.  (LakeshoreBarefootBooks@ gmail dot com)

Anything else you want to add?

As a homeschool mommy who loves books and wants to be at home with my kids but earn some extra income, this is perfect!  I'm excited about getting some great books at a fun discount, reading those books with my kids, and sharing them with others.  I really love what I've learned about this company and am excited to be a part of story, art, imagination, learning, and more!  My kids are having a blast reading through the books in my starter kit and listening to the fun CDs that come with some of the books.  We are enjoying doing this together.

You can find me here:
https://www.facebook.com/LakeshoreBarefootBooks
Lakeshore.BarefootBooks.com

Any more questions?  Post them in the comments and I'll answer there.


Sunday, January 19, 2014

Fabric Pennant Banner Tutorial


I've been wanting one of these for several years now!  As a child, we had a paper "Happy Birthday" banner that hung in our kitchen whenever someone had a birthday.  I loved it so much that I wanted a special homemade fabric one to use with my own family.  I'm not sure why I waited so long.  It was so easy to do that I whipped up another and took photos along the way for you.


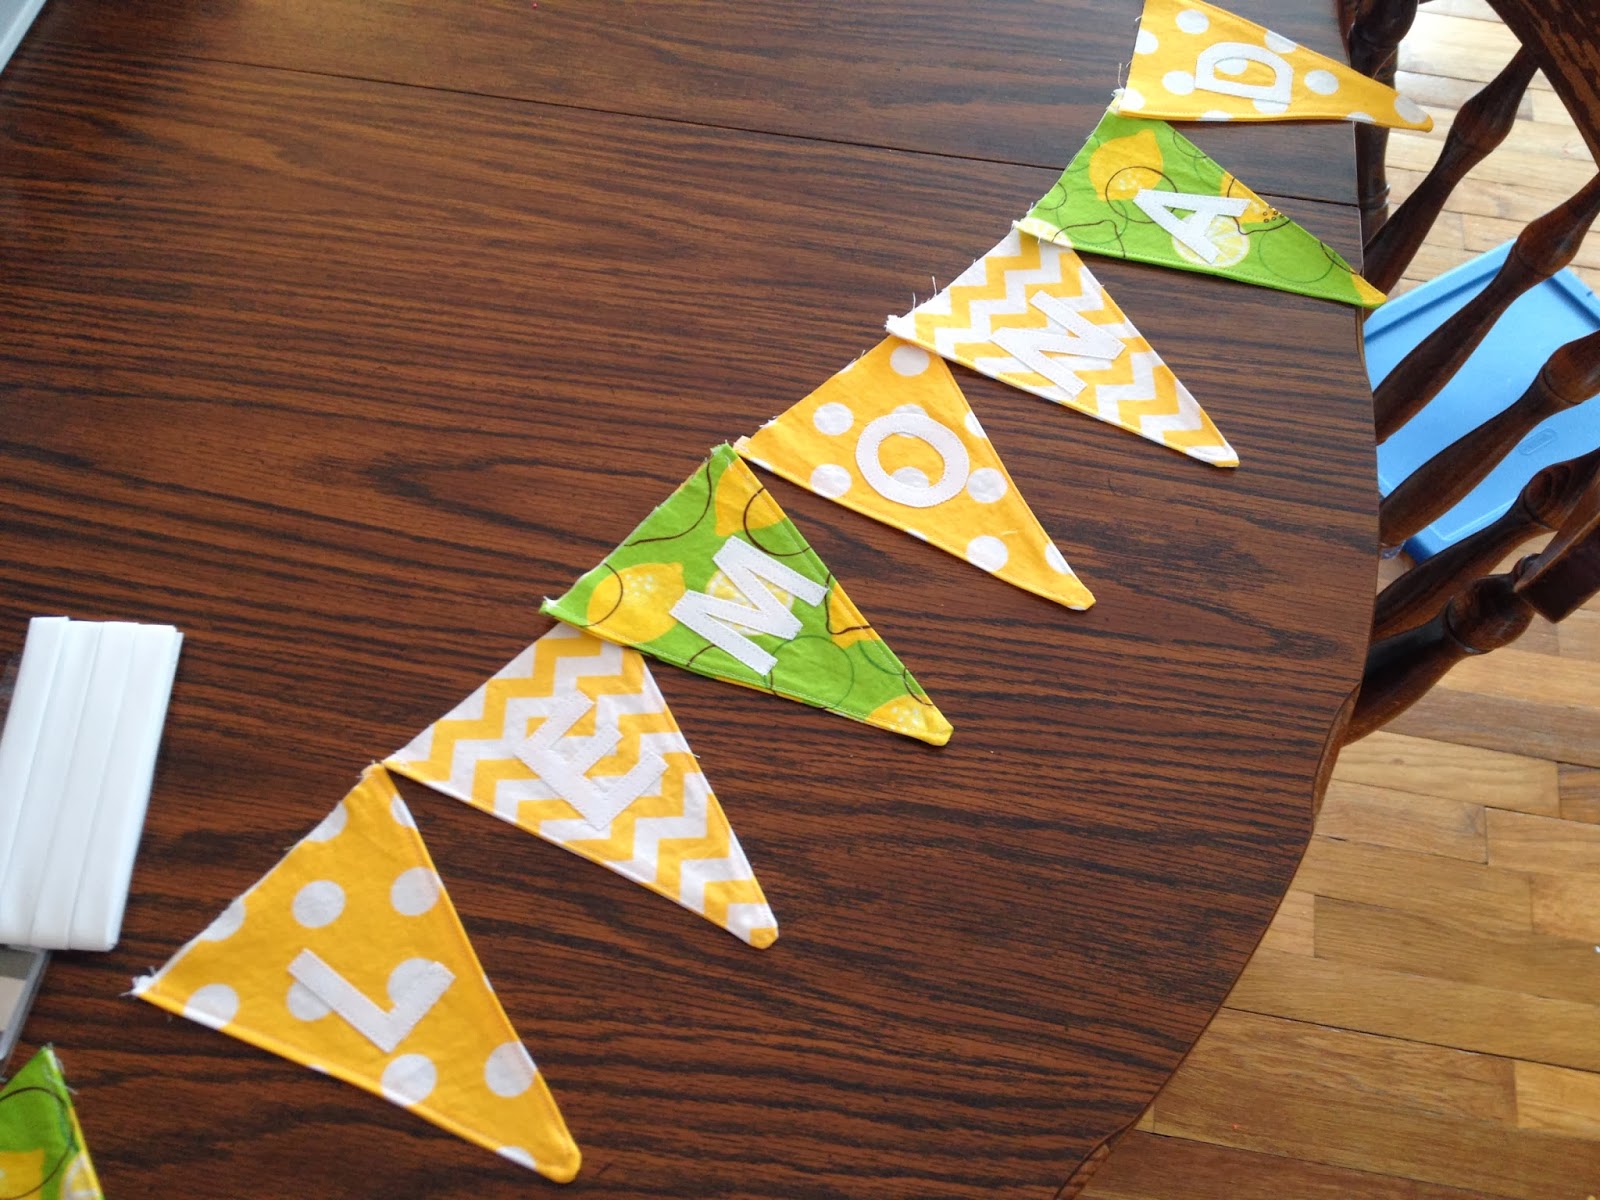
This banner is smaller than the birthday one, and says "Lemonade" on it.  The kids like to do a lemonade stand in the spring and this is going to be a fun touch.  :)  I chose three fabrics for this one, it doesn't take much of each.


I first drew a triangle shape on a manilla folder and cut it out.  My birthday banner triangle was 7 inches across the top and 9 1/2 inches from the center of the top down to the point.  The lemonade banner was smaller, 5 inches across the top and 7 inches down to the point.  Obviously you can make these any size you want.


Place your fabric so that you are cutting through two pieces at once; you'll want both a front and a back for each triangle.  As you can see in the photo, they can be cut right next to each other.  Take into consideration which way you want the fabric's design to be.  (Zig-zags going up and down, or sideways?)


Sew each triangle, right sides facing each other, down one side and up the other, leaving the top open.  As in the photo above, snip off just the tip of the triangle so that there is less bulk in the tip when you turn it.

Turn the triangle right side out, using a pencil's eraser end to be sure the tip is completely turned.  Sew down one side and up the next, just as you did before, still no need to sew across the top.  This gives the pennant a nice finished look and helps it to lay flat.  Clip your extra threads as you go.


After you've finished sewing the triangles, you can work on your lettering applique.  (Sew Sara has a great tutorial on this here too.)  On the computer, choose a font and print size that you like.  You can make the letters outline only to save on ink.  Print your design and double check that the size of the letters will work on the triangles.  Adjust and print again if you need to.  When you are happy with the size, flip the paper over and trace the letters so that you can see them clearly.

Place your Heat N Bond Lite over the letters and trace them again, being sure they are still backwards.


Cut around your letters in a big rectangle and iron them on to the fabric you are using for them.  (I used an extra thick white so that the colors of the other fabrics wouldn't show through my letters.)


Cut each letter out.  Using a ruler, decide on a good distance for the letters to be from the tip.  (Hint: use your fattest letter to be sure it will fit where you want to place it.  The "M" wouldn't have fit any lower down.)  As long as you use this same distance, your letters should be aligned nicely.


 Iron them all on, and lay out your design.  You probably have already thought about what colors you want to place where and ironed on the letters accordingly.  :)  I have a blank lemon print triangle at the front and end of my banner.


You can see in the corner of this picture that I have some white double fold bias tape to use as the top string.  I used one 3 yard package for the lemonade banner and two packages for the birthday banners.  Find the center of that tape, and then find the center of your letters.  Starting there, sew down one side, adding in the triangles as you go.  After you get to the end of the banner, keep sewing to close the bias tape, all the way to the end.


You will then go back to the middle of the tape and sew the other direction, putting in the rest of the triangles going toward the other side.  Again, sew all the way down the bias tape, closing it up.


You're done!  Admire your handiwork:


Here is another one I made in Barefoot Book colors, to have at my parties or vendor shows:


Let me know if you end up making one, I'd love to see photos.

Friday, January 17, 2014

Gluten Free Labels

A while back, I came across Gluten Free Labels:


We received some stickers and silicone tags to review.  I also purchased the toothpick flags.  While the website markets these for labeling gluten free items in your kitchen, we don't have that need.  My husband eats gluten while he is out and about, but otherwise we are all gluten free.  I do really love these tags for taking food to potlucks though!

At church, we have a potluck every Sunday after the service.  There are several other families that do not eat gluten, and I love that they can easily spot something gluten free that I've brought.  Potlucks can be super difficult for people with food allergies, and these little tags are like a beacon of hope!  - "Hey, there's something I can eat here!"  :)  I also think they would be great for taking food to a gluten free family, to assure them that you remembered their needs.

The toothpicks are perfect for sticking in muffins or cookies.  The stickers are really versatile; I stuck one on the handle of my soup ladle to be sure it stayed with the correct pot.  I love the silicone tags!  They are oven safe if you wanted to leave them on something you were baking.  I put mine on the crock pot, which was great for when it got hot and I didn't have to worry about anything melting.  The silicone tags are nice and thick, and the string part is silicone as well.  (I got two, only one is pictured.)  I'm sure we'll get a lot of use from these.

The products are reasonably priced, just $5 for two silicone tags and $4 for the toothpick flags.  There are several different packages available if you want a variety.  There is a roll of stickers that would even be great for restaurant use.  The only thing I wish is that they would make tags for dairy free items too!  Overall these are very well done and a great item to have around and make use of.

Disclosure: I received some of the products in this post for review.  All opinions are my own.  Thanks Gluten Free Labels!  

Wednesday, January 15, 2014

Barefoot Books


I'm super excited to share with you that I am now a Barefoot Books Ambassador.

Barefoot Books are filled with gorgeous artwork and wonderful stories.  We've recently fallen in love with them and are excited to share them with you.  Many of the books have crafts or extra information in the back, making them perfect for homeschoolers, teachers, or any household with a love of learning.  Barefoot Books sells bilingual books, books with music CDs, puzzles, puppets, and more. 

I'll be sharing more about our favorite books soon but wanted to let you know about a really great sale right away.  There is huge winter sale going on right now, with items up to 75% off.  As a new ambassador, I'm running a giveaway where anyone who orders through my website before the end of the month will be entered to win a free book.  These sale prices are definitely worth taking a look at and stocking up on birthday gifts, baby shower gifts, or any other books you may need/ want!

You can check out my website here - lakeshore.barefootbooks.com

and for my Facebook page go here - www.facebook.com/LakeshoreBarefootBooks 

Thursday, January 2, 2014

Keep That Puppy Busy!

How on earth do I handle four kids and a puppy?  Keep. that. puppy. busy!!  We have a rotation of fun toys, treats, bones, etc to keep Poca entertained.  She recently got to try out Planet Dog's Orbee-Tuff Snoop Treat Dispensing Toy and loves it.

The Snoop is a sturdy, bouncy, treat containing, ball sort of a toy.  You can fill it with treats and then as it rolls around, the treats are trapped inside and come out haphazardly over time.


We also got, and I highly recommend, a smaller ball (Glow for Good) that stuffs in the Snoop and adds more of a challenge for the dog.  Poca has to remove the ball before any treats will come out.  The ball itself can be stuffed with treats too.


The Snoop and the smaller ball are both very sturdy and thick.  They are also sort of bouncy, which is fun for Poca.  If she puts her paw on the ball and pushes on it, it will kind of jump up and then roll around.  She also knows that if she picks the ball up and then drops it, the treats will bounce out.  She drops it over and over; its cute to watch.


She can carry the Snoop, stuff her nose into it and try to lick the treats out, push it around with her nose and so on.  We've been giving her at least one meal a day in her Snoop.  It takes her a while to work all the food out of it.  I take it away from her when she is done with it, just to prolong its life, but so far I don't see any damage on it.


Other good things: the Snoop is made in the USA, Planet Dog has a 100% guarantee, profits from the Glow for Good ball go to support canine service dogs.  

Planet Dog sent us some of their all natural treats too.  I was super impressed with the ingredients: barley flour, rye flour, peanut butter, blueberries, cinnamon (that's all!).  Poca loves her Planet Dog toys and so do we!